Archive for February, 2010

h1

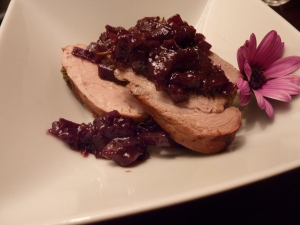
Pork Tenderloin with Wine-Braised Onions

February 28, 2010

This afternoon, without much of a plan, I started sautéing some yellow onions in a little olive oil. Without knowing what these onions were going to do, I poured a third of a bottle of wine over them, added a few spices, turned the heat down, and let them cook for an hour.

Once I realized that I had a pork tenderloin in the fridge, it all started to come together. Sometimes the best ideas just sortof, well, happen.

So here it is, Pork Tenderloin with Wine-Braised Onions.

For the onions:
1 small to medium yellow onion, sliced thin
1 pinch of kosher salt
About 1 cup of dry red table wine
2 cloves
5 peppercorns
1 bay leaf
1/2 cup beef or chicken broth

For the pork:
1 pork tenderloin, trimmed of any excess fat and silver skin
1 teaspoon kosher salt
1/4 cup olive oil
1/4 cup balsamic vinegar
6 black peppercorns
2 whole cloves
1 small bay leaf
1 small bunch fresh thyme

  • In a small saucepan, heat a small amount of olive oil over medium heat until glossy.
  • Add the onions and salt and sauté for a moment or two, then add the rest of the ingredients except the broth. Partially cover.
  • Turn the heat down to medium-low and simmer until the wine has reduced to a few remaining tablespoons (about 20 minutes), and then add the broth.
  • Continue to cook uncovered over low heat until the liquid is reduced again and the onions are tender.
  • Keep warm until ready to serve.
  • Pre-heat the oven to 375° and place a sheet pan in the oven to preheat.
  • Salt the pork, set aside.
  • In a quart-sized bag, mix all the ingredients and close the bag. Shake vigorously.
  • Place the pork in the marinade, and seal the bag, pushing all the excess air out.
  • Marinate for 30 (or up to 60) minutes, turning the bag over every 10 minutes to ensure an even marinade.
  • Take the pork out of the marinade and dry well on a paper towel. Rub a small amount of oil on the pork, and place on the pre-heated baking dish.
  • Bake for about 30 minutes, turning the pork every 10 minute. Test the pork after about 20 minutes to avoid overcooking. You’re looking for a slight amount of pink in the center.
  • Remove from the oven and tent with tin foil for 5 minutes.
  • Slice thinly and serve with braised onions.

Enjoy!

(In the future, I’ll pan sear the pork before putting it in the oven for a better crust. But keep an eye on the pork. I know you’ve been taught to cook the hell out of pork, but leave a little pink in the center. It’ll continue to cook once it’s out of the oven and tented.)

h1

Pretending it’s Spring

February 27, 2010

h1

Flageolet Bean Stew with Braised Greens

February 22, 2010

This weekend was rainy and cold: the perfect weather for beans and braised greens. The particular kind of bean that I used here was a flageolet, a small pale green french variety that you can find at the farmer’s market or local gourmet foodstore (or here). If you can’t find these, use any small white bean such as Great Northern or Navy.

There are so many varieties to this dish, so feel free to mix it up. In the recipe below, I’m going to list shallots, for instance, but I was out of shallots when I made them and used a sliced scallion instead. Feel free to mix it up, but the basic concept is the same.

The recipe below serves 2 or 3 dinner sized portions. Feel free to adjust as necessary.

Flageolet Bean Stew

1 cup flageolet beans, or other small white bean, picked over and soaked overnight, then cooked according to the package. (I’ll do another post later on cooking beans, but a good primer can be found here)
1 slice of bacon, diced into small cubes
1 small shallot, minced
2 cloves garlic, minced
1 stalk celery, minced
2 small carrots, minced
2 whole cloves
1 bay leaf
1 sprig of thyme or rosemary, or both
1 pinch of kosher salt
1/4 c. peeled, chopped tomatoes (canned is fine and in fact I prefer it here, but drain off some of the liquid)
1 cup chicken or beef broth

  • In a small dutch oven, cook the bacon until crispy and the fat is rendered. Reserve the bacon pieces.
  • Add the minced shallots and cook over medium heat until translucent, about one minute
  • Add garlic and cook for 30 seconds more
  • Add carrots, celery, bay leaf, cloves, herbs, and salt
  • Continue to saute for a few minutes more until all the vegetables begin to soften. Your kitchen should be smelling blissfully delicious right about now.
  • Add tomatoes and cook until the liquid is evaporated
  • Add beans and stir to combine with other ingredients. Careful not to break up or mash the beans.
  • Add the broth so that it just covers the beans and cook on a low simmer for 15-20 minutes.
  • Taste and add salt and cracked pepper if you’d like. Top with the bacon bits and braised greens (recipe follows)

Braised Greens

I’m not going to go through this like a formal recipe, actually. This is more a technique, and I think it should be quite loose. You can do this on the stovetop, in the oven, or frankly in the microwave (but, don’t, there’s no need). The basic concept is to braise any hearty greens over a period of time until soft and tender.

My favorite greens to braise include beet greens, swiss chard, mustard greens, and kale. Some farmer’s markets stands sell a mixture of many types of greens and these are wonderful to pick up with their variety of textures and flavors.

One thing that I say a lot is that you don’t need to overcook these greens. Once they are soft and a bit tender, stop cooking them and eat!

Here’s the idea: saute some shallots or onions along with garlic in a small amount of butter or oil (or both). Add greens and stir until the greens are coated in the fat and begin to wilt. Add a small amount of wine and stir, then add about a 1/2 cup of broth or water. Turn heat down to low and cover.

Cook for about 10-15 minutes, stirring occasionally. If the greens dry out, add a little more liquid. If they are still not quite tender after 15 minutes, continue to cook a few minutes longer.

h1

The Most Perfect Caramel Sauce

February 22, 2010

There is no end to the things you can think of to have caramel sauce with: ice cream, brownies, bananas (omg), or even just a spoon.

Making caramel is a cinch, and courtesy of Smitten Kitchen comes this version, a salted buttery caramel sauce that makes me swoon just thinking about it.

Make a batch (or two) and store it in the refrigerator. It’ll definitely last a few weeks, and frankly the last little bit has been in my fridge for over a month and I just polished it off tonight — it was still good. Now it’s just time to make more!

Salted Butter Caramel Sauce

I highly recommend a small mason jar with a tight-fitting lid for storage in the fridge. It will keep any unseemly smells and flavors away from your sauce. Okay, here we go:

1 cup granulated white sugar
3 ounces salted butter, preferably “European” style or artisan butter. Seriously, here it will make a difference.
1/2 cup plus 2 T. heavy cream, at room temperature
A pinch or two of sea salt or kosher salt, to taste

  • Pour the sugar into a large saucepan or dutch oven, whisking as the sugar melts into a smooth sticky sauce.
  • Cook the liquified sugar until it becomes a dark copper color. You want to get it as dark as possible before it burns. Unfortunately there’s only a few short moments between those two points, so watch carefully. Now is NOT the time to answer the phone or start an episode of Family Guy.
  • Add the butter and quickly whisk the sauce to evenly melt the butter.
  • Just before the butter is fully incorporated, add the cream and turn off the stove. At this point it will bubble up something fierce. Don’t worry.
  • Continue whisking until the sauce is smooth.
  • Taste it now (careful, it’s hot) and add salt if necessary, stirring well to incorporate it into the finished sauce.

That’s it. Told you it was easy.


h1

Baked Bay Scallops with Tomatoes

February 16, 2010

Jared and I frequently watch Alton Brown’s Good Eats and have to say I was horrified when I heard he was going on a diet. I mean, what about his segments on pies, or on cobbler, or on…chocolate!? Were they never going to have their well-deserved encores?

I guess I needn’t have worried. Last night Alton did a show on Scallops, and there was never a lack of butter or oil. I can breathe easy again.

So here it is, my interpretation on dish #2 from Episode EA0916H, “Shell Game IV (Scallops)

Baked Bay Scallops with Tomatoes

Alton calls these “Scallops on the Half Shell” but I think a more descriptive title works better here. I also didn’t serve them on scallop shells, but rather in small single-serving ramekins. You can bake them in any oven-proof baking dish, but single-serving ones are very cute on the table.

1 T. each unsalted butter and extra virgin olive oil
1 small clove of garlic, minced
1 large pinch of kosher salt
1 cup or so of panko bread crumbs, or fresh bread crumbs, or crushed crackers
1 pinch dried crushed red pepper flakes (or more to taste)
8 ounces bay scallops, rinsed and dried thoroughly
1/2 cup chopped tomatoes (if using canned tomatoes, include some tomato juice from the can)
1 t. each dried parsley and dried basil or double that amount fresh

  • Pre-heat oven to 400°
  • Melt butter in the olive oil in a 10″ nonstick skillet over medium-low heat.
  • When butter is melted and foam has subsided, add garlic and saute for 30 seconds until very fragrant, but not browned.
  • Add dried red pepper flakes and saute for an additional 15-20 seconds.
  • Add bread crumbs and stir until the crumbs have absorbed all the butter mixture. Turn heat down to low.
  • Toss scallops with kosher salt, set aside (you can do this up to 10 minutes in advance, if you like)
  • Mix herbs together with tomatoes in a small bowl. Season to taste with salt and pepper, as desired.
  • Spoon half the tomatoes into the bottom of a small ramekin.
  • Top the tomatoes with half the scallops and then cover with an even layer of bread crumbs
  • Bake uncovered for 10-12 minutes until the topping is nicely browned and crisp and the scallops are cooked through to medium/medium-rare (as desired).
  • Serve immediately. Crusty bread recommended.

Enjoy my friends! Here’s what it looks like: